How to remove background in photoshop
Removing the background in PhotoShop is a helpful skill for a lot of reasons in design and marketing. Here’s how to remove background in PhotoShop and how it might be used.
Removing the background in PhotoShop is one of the most useful skills when it comes to both design and marketing. It could be you’re looking to separate a logo, create a vector of one item, move an aspect of the image to a different background or make a silhouette of something.
Being able to master this skill gives you much greater flexibility moving forward to work with images and graphics to use them in a greater variety of ways. Here are a few ways in which you can achieve this.
Quick selection tool
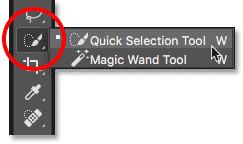
The ‘quick selection’ tool does exactly what it sounds like it does – quickly selects. To use this you:
- Select the ‘Quick Selection Tool’ from the tools panel.
- Click and drag your mouse on the unwanted background. You’ll see a row of dots appearing and growing as you go. Gradually work around your subject adding to the selection as you go.
- If you accidently select areas you don’t want to include, hold down the ‘Alt’ or ‘Option’ key to toggle the subtraction mode for the tool. Then you can click and drag your mouse around the background area you wish to remove. Release the key when you’re ready to go back to adding to your selection again. Zoom in on areas that are fiddlier to ensure you get the best possible finish.
- Right-click within your selection then select Layer Via Copy. Your selection will appear on a new layer with no background without affecting your original image.
Magnetic Lasso tool
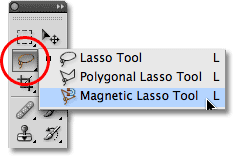
When asking how to remove background in PhotoShop, it’s good to know there is more than one option. The Magnetic Lasso tool works in quite a similar way, and here’s how to use this tool.
- Select the Magnetic Lasso tool from the tools panel.
- Click at a point on the item you want to remove from the background. Then start to trace around the object. As the name suggests, the tool is automatically drawn to an edge like a magnet and will select as it goes. However, you can also regularly click on areas to ensure an easier finish.
- Work slowly to ensure you don’t end up selecting areas you don’t want to and stay outside the item. If you end up with some areas selected you still want to remove, you can always remove them later when fine tuning.
- Once the area is selected you can copy and paste it into a new PhotoShop file without the background. If there are still some areas you want to exclude, then you can zoom in and remove those small areas by selecting them with the Magnetic Lasso then clicked delete.
Magic Eraser tool.
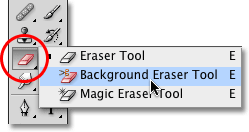
Instead of picking an area out, this way of working literally deletes the background, so it’s important to work from a copy of the image to make sure you don’t ‘lose’ the original. Here’s how it works:
- Once you make sure you’re working from a copy of the photo to ensure you keep the original, select the Magic Eraser tool from the tools panel.
- Click an area you wish to remove, and the tool will remove that area. For example, if there is a background with trees and grass, clicking on the truck of the tree will remove the trunk, then click the leaves, etc. It will remove that particular colour. If your item is on a one colour background it is likely to only need one click. More complex backgrounds will need more work.
- If you accidently delete an area you wanted, use control-Z to undo that action.
- If you want to fine tune the edges, zoom right in and use the standard Eraser tool in a smaller size ‘brush’ to work around them, or use the Magnetic Lasso tool.
Removing background in PhotoShop is a helpful skill and one worth practicing and perfecting for the future